
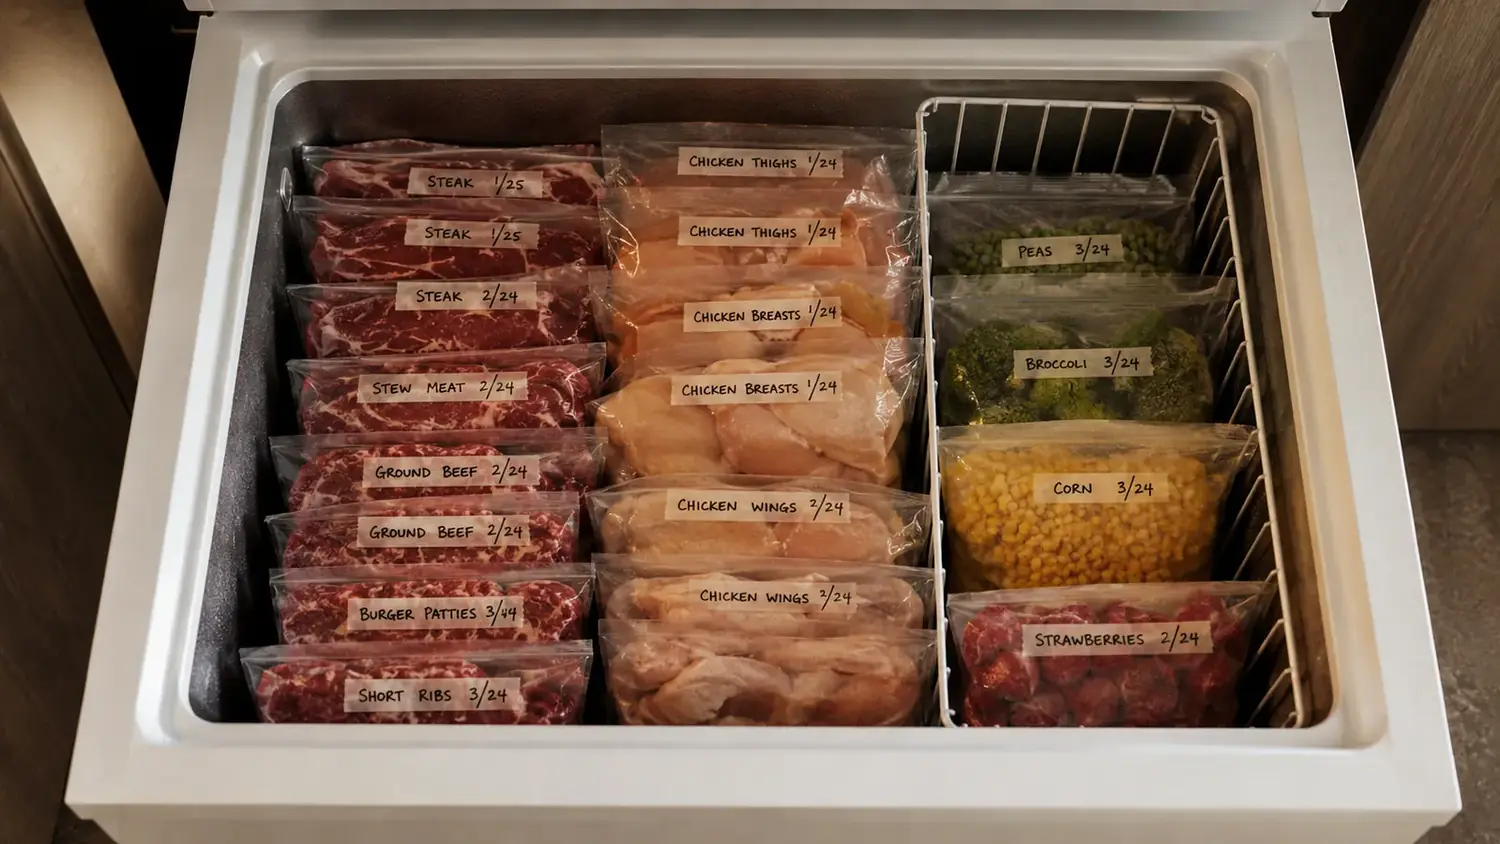
Freezer burn isn't really about the cold. That's the part most people get wrong. It's not that your freezer is too warm or that the meat has been in there too long. It's air. Every time moisture inside a piece of food meets dry, circulating freezer air, some of that moisture escapes the surface and turns straight to ice crystals, leaving behind those gray, leathery patches that taste like cardboard no matter how you cook them. I used to toss out a package or two of freezer-burned chicken or ground beef almost every month, which after a year adds up to a genuinely embarrassing amount of good food thrown straight in the trash.
The fix isn't a colder freezer or fancier freezer bags. It's cutting off the air supply entirely before the food ever goes in, and that's exactly what a vacuum sealer does. I switched to a FoodSaver compact vacuum sealer a while back after getting tired of watching perfectly good pork chops turn into freezer casualties, and it changed how long food actually lasts in our chest freezer out in the garage. This guide walks through the five steps that make that method work, in the order I'd tell a neighbor if they asked me over the fence.
Stop Throwing Freezer-Burned Meat in the Trash
The FoodSaver Compact Vacuum Sealer pulls the air out of the bag before it ever hits the freezer, which is the one thing standard zip-top bags can't do. Less air means no ice crystals, no gray leathery patches, and food that still tastes fresh months later.
Amazon Check Today's Price on Amazon →Step 1: Understand What You're Actually Fighting
Before you change a single habit in your kitchen, it helps to understand what's happening inside that bag. Freezer air is dry by design, which is part of what keeps a freezer running efficiently. But dry air pulls moisture out of anything it touches, including the surface of your food, through a process called sublimation, where ice turns directly into vapor without ever becoming liquid. That vapor drifts, refreezes somewhere else in the bag or on the walls of the freezer, and the spot it left behind on your food dries out and turns that familiar grayish white.
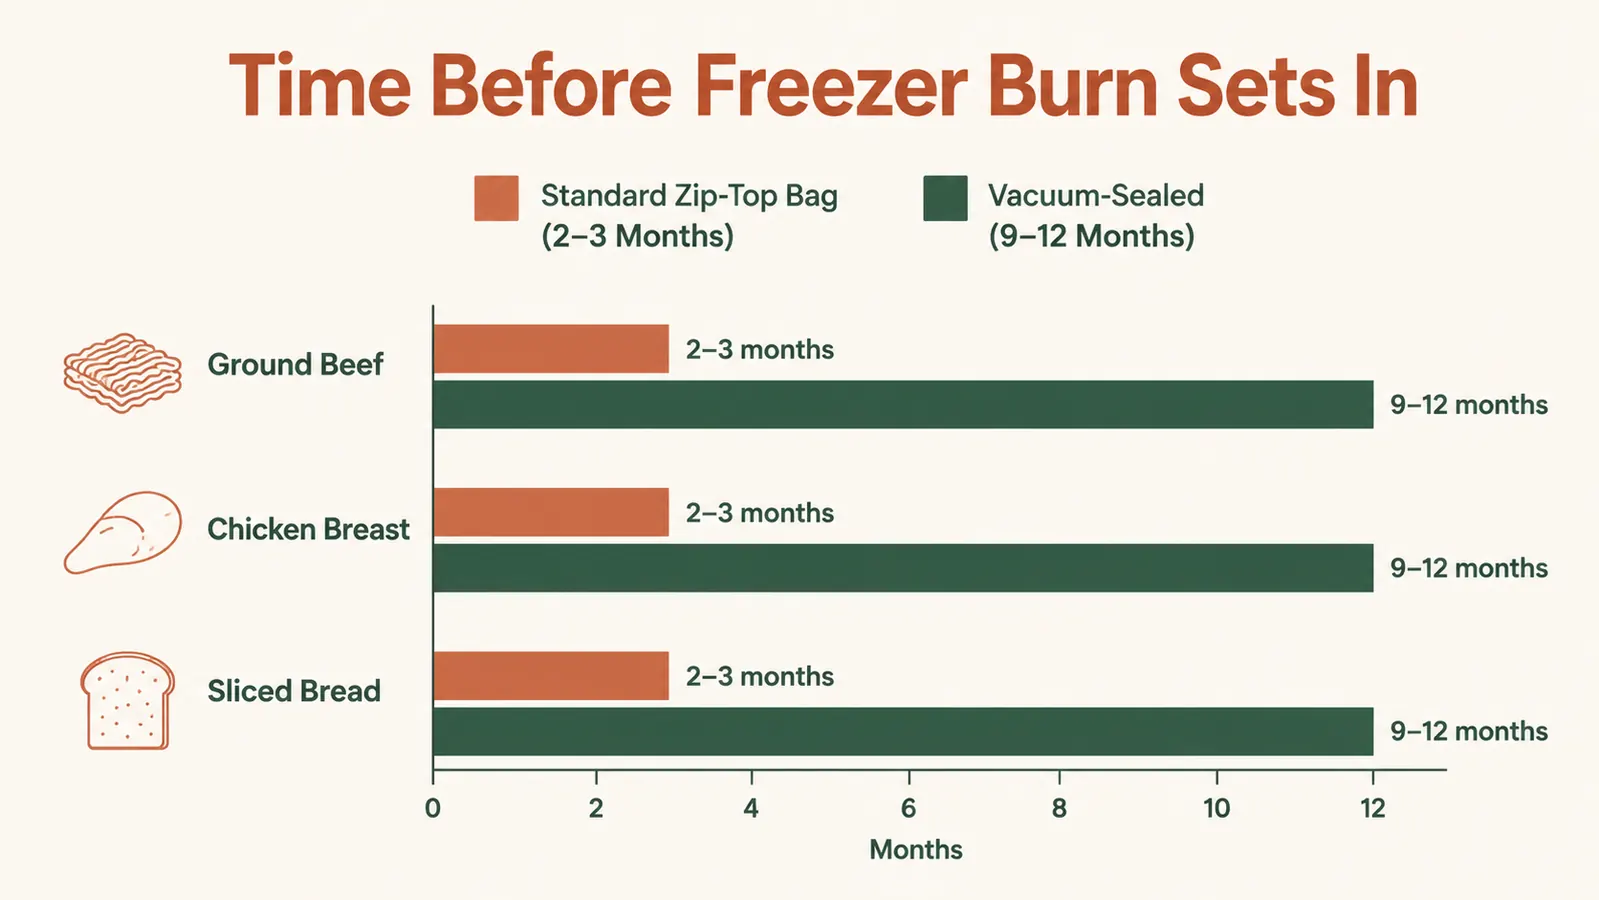
A standard zip-top bag, even a good one, still traps a layer of air around the food. That trapped air is enough to start the sublimation process, just more slowly than an open container would. Wrapping something in foil or freezer paper helps a little more, but there are always gaps, seams, and folds where air sneaks in. None of these methods actually remove the air, they just slow down how fast it does its damage. I put a bag of ground beef through a side-by-side test once, one in a name-brand zip-top bag and one vacuum sealed, both dated the same day. By month three the zip-top bag already had visible ice crystals and a dull gray patch along one edge. The vacuum-sealed bag looked untouched.
That's the whole idea behind vacuum sealing. Instead of managing the air, you take it out of the equation. Once the bag is pulled tight against the food with no air pocket left, there's nothing left for the ice crystals to form in. I didn't fully believe this until I pulled a vacuum-sealed pork shoulder out of the freezer after almost eight months and it looked and cooked like it had gone in the week before. That's the difference between fighting the air and removing it.
Step 2: Vacuum Seal Before Anything Touches the Freezer
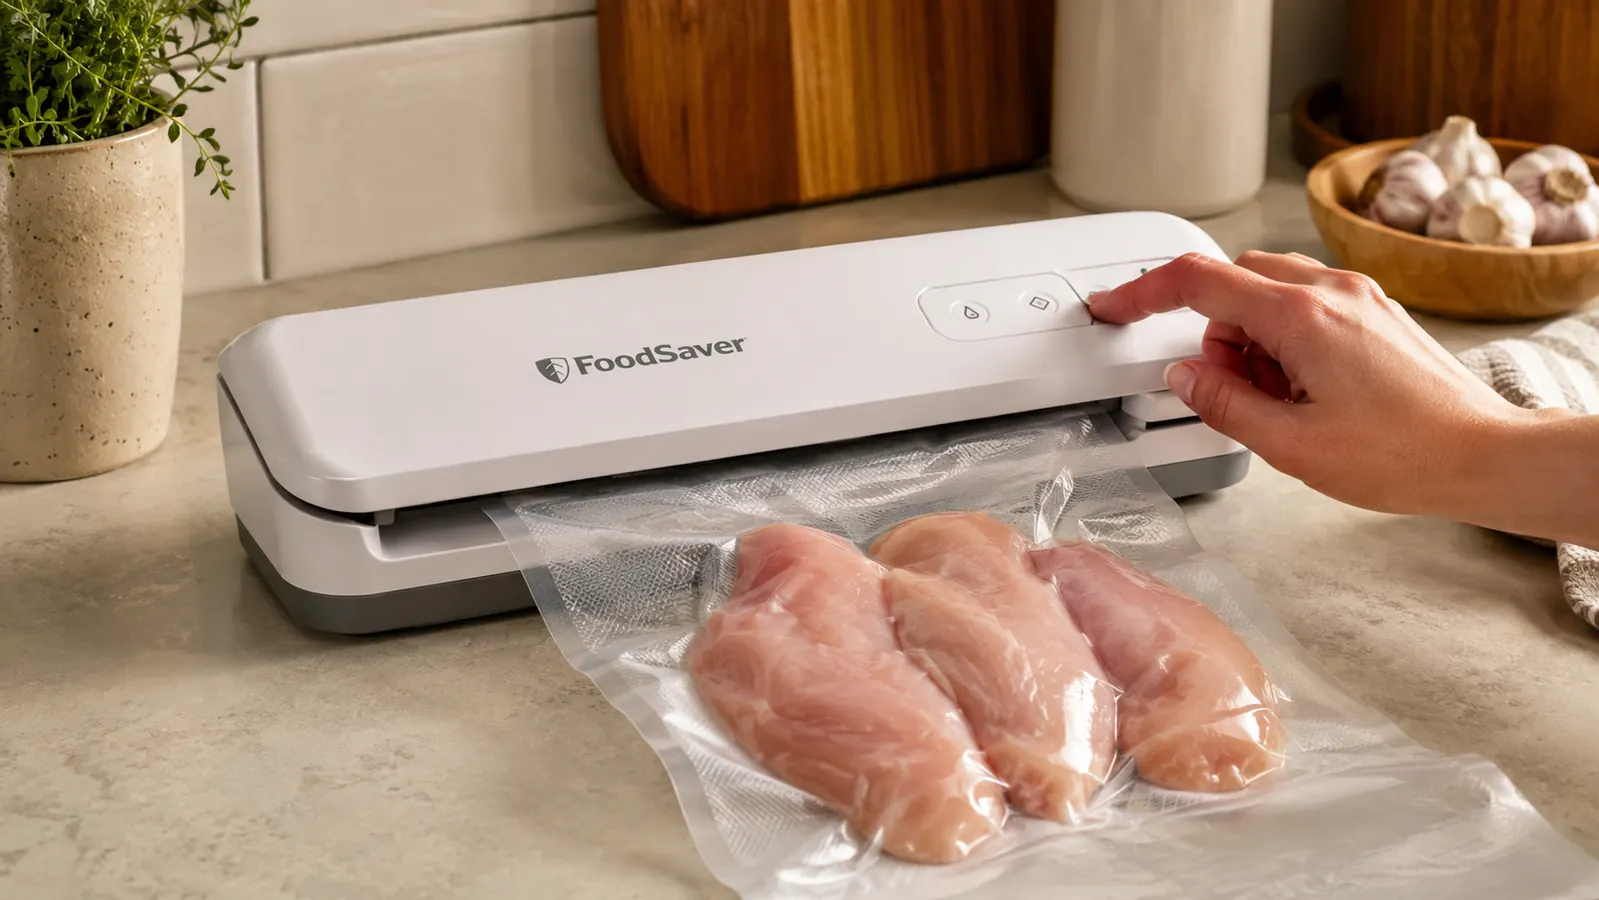
This is the step that does most of the work, and it's simpler than people expect. Lay the food flat in a FoodSaver bag, leaving a few inches of empty bag above the food so there's room for the machine to form a clean seal. Set the open end in the sealing channel, close the lid, and let the machine pull the air out and seal the edge shut. The whole process takes maybe fifteen seconds per bag once you've done it a handful of times.
For anything with sharp edges, like bone-in chicken thighs or a rack of ribs, I wrap the corner in a folded paper towel first so it doesn't puncture the bag during the vacuum cycle. For softer or wetter foods, like ground beef, marinated meat, or berries, a lot of vacuum sealers have a moist or gentle setting that pulls slightly less aggressively so liquid doesn't get sucked into the machine itself. The FoodSaver's control panel makes it easy to switch between a dry and moist setting depending on what's going into the bag, which I use for anything with sauce or marinade already on it.
One thing worth doing for soft or liquid-heavy foods, soups, stews, sauces, is a quick pre-freeze. Spread the food in a thin layer on a tray or in a shallow container, freeze it solid for a couple of hours, then transfer it into the vacuum bag and seal as usual. This keeps the vacuum from pulling liquid up into the sealing strip and ruining the seal, which is the single most common mistake I see people make the first few times they try this.
Step 3: Portion and Label Before You Seal, Not After
This step is where most of the real savings happen, and it's easy to skip if you're in a hurry. Instead of vacuum sealing a whole five-pound package of ground beef in one bag, break it into the portions you'll actually cook, one pound each, or whatever fits your usual dinners. Once a bag is sealed, you're committed to thawing everything inside it at once. Portioning first means you can pull exactly what tonight's dinner needs and leave the rest untouched in the freezer.
Label every bag before it goes in, not after, while the marker is still in your hand and the bag is still sitting on the counter. Write the contents and the date directly on the bag with a permanent marker. It sounds obvious, but I used to skip this step constantly, and six months later I'd be holding a solid, opaque, vacuum-sealed brick trying to guess whether it was chicken thighs or pork chops by weight alone. Now every bag gets a date and a name, and I do a quick freezer check on the first of every month to see what's coming up on its window.
If you cook for one or two people, portioning small is worth the extra few minutes it takes. If you're feeding a full table, sealing in family-sized portions saves you from running the sealer every single night. Either way, think about your actual dinner plate before you seal, not just the size of the package the store sold you. This habit is also what makes buying in bulk actually worth it. A large family pack of chicken or a whole loin from the butcher stops being a gamble once you know every portion will come out of the freezer tasting like it was sealed yesterday, instead of turning into three good meals and two you end up scraping into the trash.

Step 4: Load the Freezer So the Cold Air Can Actually Work
Vacuum sealing removes the air around the food, but a poorly organized freezer can still work against you. Flat, vacuum-sealed bags stack like books instead of piling up like loose bricks, and that flat shape means cold air can move evenly around each package instead of getting trapped against a few bags while others stay warmer in the middle of a pile. I stand our bags up on their edge in labeled bins by category, meat in one bin, vegetables in another, so nothing gets buried and forgotten at the bottom for a year.
Try to seal and freeze food while it's already cold, straight from the fridge rather than sitting on the counter warming up. Food that goes into the freezer already cold reaches a safe freezing temperature faster, which limits the brief window where ice crystals can start to form before everything locks solid. It also keeps your freezer running more efficiently overall, since it isn't working overtime to pull heat out of room-temperature food.
Don't overpack the freezer to the point that air can't circulate at all. A freezer that's completely jammed floor to ceiling actually holds temperature less evenly than one with a little breathing room between packages. I keep ours around three-quarters full, organized by bin, with the oldest labeled bags moved toward the front so they get used first instead of getting rediscovered a year later.
Step 5: Do a Short Freezer Check Every Month
Vacuum sealing dramatically slows down freezer burn, but nothing stops it forever if a bag develops a pinhole leak or the seal wasn't perfect to begin with. Once a month, usually the same day I take out the trash cans, I spend five minutes going through the freezer bins, checking dates, and giving each bag a quick squeeze. A properly sealed bag should feel tight against the food with no air pocket. If a bag feels loose or puffy, that's air that snuck back in, and it's worth reheating the seal or moving that item to the front of the line to use soon.
This is also when I rotate stock, pulling anything close to its labeled date to the front and pushing newer bags to the back, the same first-in-first-out system a restaurant kitchen uses. It takes almost no time once it's a habit, and it means we're never surprised by a mystery bag from two winters ago hiding behind everything else.
If you ever do find a bag that's lost its seal, don't panic and toss the food automatically. As long as it's still solidly frozen and hasn't thawed and refrozen, you can usually just re-cut the bag a little shorter and run it through the sealer again for a fresh seal. It's a two-minute fix that saves food you'd otherwise write off.
What Else Helps
A cheap freezer thermometer is worth having even if your appliance has a built-in display, since those built-in readouts can drift off by several degrees over the years without you ever knowing. Keeping your freezer at or below zero degrees Fahrenheit gives every vacuum-sealed bag the best possible odds. A roll of FoodSaver bags on hand, rather than only pre-cut bags, also makes it easy to size each bag to the exact portion instead of stuffing a big chicken breast into a bag meant for a burger patty, which wastes both plastic and vacuum suction. And keep a permanent marker taped right to the side of the sealer itself. It sounds small, but it's the difference between labeling every single bag and eventually giving up on the habit because the marker wandered off to a junk drawer.
This same method works well past raw meat. Sliced bread vacuum seals beautifully and thaws in about twenty minutes on the counter with none of the icy, stale bite freezer bags tend to leave behind. Berries and other soft produce do best with that quick pre-freeze step first, so they stay loose inside the bag instead of turning into one solid clump. Even leftovers reheat cleaner out of a vacuum bag, since there's no freezer smell working its way in the way it does with a loosely closed container. Once you've run a few batches through, it stops feeling like a kitchen chore and starts feeling like the same habit as washing dishes, just one that quietly keeps money out of the trash can.
Freezer burn was never a cold problem. It was always an air problem, and once you remove the air, the cold finally gets to do its job.
Give Your Freezer the One Upgrade That Actually Works
A FoodSaver Compact Vacuum Sealer pays for itself the first month you stop throwing out freezer-burned meat. Seal it flat, label it once, and everything in that freezer stays as fresh as the day you put it away.
Amazon See Current Price and Availability →